Remote IoT With Raspberry Pi: Your Free Guide To Anytime, Anywhere Access
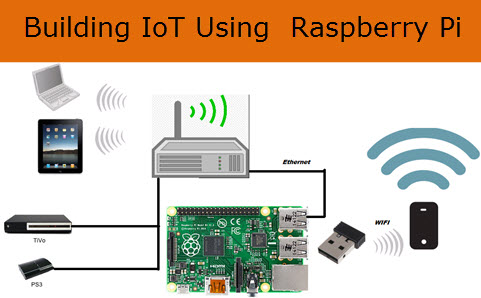
The world of IoT (Internet of Things) is rapidly expanding, and at its heart often lies the versatile and affordable Raspberry Pi. From smart home automation to industrial monitoring, the Raspberry Pi has become a go-to device for countless projects. But what truly unlocks its full potential is the ability to access and control it remotely. Imagine managing your IoT devices from anywhere in the world, receiving critical alerts, and monitoring performance without being physically present. This isn't just a dream; it's the reality of remote IoT solutions.
While navigating the landscape of remote IoT solutions can feel overwhelming, especially when looking for cost-effective options, this article is your comprehensive guide. We'll explore how you can achieve secure, efficient, and scalable remote access to your Raspberry Pi and other IoT devices for free, transforming your projects and expanding the utility of your powerful little computer.
The Power of Remote IoT with Raspberry Pi
Embracing the power of remote IoT with Raspberry Pi isn't just about convenience; it's about transforming your Raspberry Pi into a fully accessible and controllable device. This expands its utility and makes it a more powerful tool for a myriad of applications. The ability to remotely access and control your Raspberry Pi opens up a world of possibilities for IoT projects, allowing you to:
- Monitor and Alert: Implement remote monitoring and alerting for Raspberry Pi and IoT devices. Gain crucial insight on CPU, memory, and disk utilization, and determine when peak activity is happening on your application. This proactive approach helps prevent issues and ensures optimal performance.
- Access from Anywhere: Whether you're across the room or across the globe, you can access your Raspberry Pi from anywhere. This means managing your smart garden while on vacation or checking sensor data from a remote industrial site without needing to travel.
- Expand Utility: A good remote IoT solution ultimately transforms your Raspberry Pi into a more powerful tool, enabling applications that would otherwise be impossible. Remote IoT solutions are essentially systems that allow you to access, manage, and control your IoT devices, like a Raspberry Pi, from a remote location.
- Real-time Control: Not just monitoring, but also sending commands and controlling your devices in real-time, making adjustments as needed.
The Raspberry Pi, with its widespread adoption in IoT applications, has further amplified the importance of finding the best remote access solutions, particularly those that are free and robust.
The Core of Remote Access: SSH
When it comes to remote access for IoT devices using Raspberry Pi, SSH (Secure Shell) has become a popular and fundamental method for controlling and managing devices remotely. SSH provides a secure, encrypted channel for communication between your local machine and your Raspberry Pi. By default, the SSH server listens on TCP port 22, making it a standard and widely supported protocol.
Beyond the traditional command-line interface, modern solutions also allow for a more user-friendly experience. For instance, it is a secure remote access solution for Raspberry Pi OS, allowing you to connect to your Raspberry Pi desktop and command line directly from any browser. This browser-based access simplifies management, making it accessible even for those less familiar with command-line operations.
Free Remote Access: Overcoming Network Challenges
A common question among Raspberry Pi enthusiasts is, "Yes, is it possible to access your Raspberry Pi IoT devices from anywhere for free?" The answer is a resounding yes, though it often involves navigating certain network complexities. Traditional methods like dynamic DNS and port forwarding have been used, but they come with their own set of challenges.
The Port Forwarding Dilemma
While SSH typically listens on port 22, accessing your Raspberry Pi directly from outside your local network can be tricky. But without port forwarding, if your Raspberry Pi is behind NAT (Network Address Translation), a firewall, or CGNAT (Carrier-Grade NAT), you will not be able to access your device. Port forwarding essentially tells your router to direct incoming traffic on a specific port to a specific device on your local network. However, it can be complicated to set up, might pose security risks if not configured carefully, and is often unavailable if you're behind CGNAT (common with many ISPs).
Free Solutions Without Port Forwarding
Fortunately, there are innovative ways to achieve remote access for free without the hassle of port forwarding. These methods typically involve creating a secure tunnel from your Raspberry Pi to a public server, which then allows you to connect to your Pi from anywhere. In the following guide, we explain how you can remotely access Raspberry Pi and other IoT devices for free without port forwarding. Services like Pinggy for remote SSH access are excellent examples of this approach. They establish a secure, encrypted channel, bypassing the need for direct port exposure.
By using such services, your Raspberry Pi initiates an outbound connection to a public server, and then your remote client connects to that same public server, effectively creating a secure bridge. This circumvents the NAT and firewall issues, making your Raspberry Pi accessible even if it's behind a complex network setup.
Prioritizing Security in Remote IoT
When dealing with remote access, especially for IoT devices, security is paramount. The best solutions offer secure connections, robust security features, and are easy to set up and use. By following these steps, you establish a secure, encrypted channel for remote access to your Raspberry Pi, protecting your data and devices from unauthorized access.
Understanding Secure P2P Connections
One of the advanced concepts in securing remote IoT devices using Raspberry Pi is the idea of Peer-to-Peer (P2P) connections. What is securely connect remote IoT P2P, and why is it important? When we talk about securely connecting remote IoT P2P Raspberry Pi, we’re talking about creating a network that lets your devices communicate directly without needing a central server. This overview of securely connect remote IoT P2P Raspberry Pi highlights its benefits:
- Enhanced Privacy: Data flows directly between your devices, reducing reliance on third-party servers.
- Reduced Latency: Direct communication can lead to faster response times.
- Increased Resilience: The system is less dependent on a single point of failure (a central server).
This article will guide you through the process of connecting a remote IoT device, specifically a Raspberry Pi, in a P2P environment, complete with a free download option for essential software and tools. Implementing P2P adds another layer of security and efficiency to your remote IoT setup.
Monitoring and Alerting with Cloud Services
Beyond direct access, robust remote IoT solutions also incorporate monitoring and alerting. For instance, you can set up a CloudWatch alarm to send a notification when an event triggers a condition in one of your alarm policies. This means you can be instantly informed of critical events, such as unusual CPU spikes, low disk space, or a sensor reading outside the normal range, allowing you to take immediate action.
Setting Up Your Free Remote IoT System
Getting started with your free remote IoT system on Raspberry Pi involves a few key steps. While specific instructions may vary depending on the chosen method (e.g., dynamic DNS, VPN, or tunnel services like Pinggy), the general process involves:
- Prepare Your Raspberry Pi: Ensure your Raspberry Pi OS is up-to-date and SSH is enabled.
- Choose Your Remote Access Method: Decide whether you'll use traditional port forwarding (if feasible and secure), or a tunnel service that bypasses NAT/firewall issues. For free solutions, tunnel services are often the most straightforward.
- Install Necessary Software: This might involve installing a client for a tunnel service, or configuring dynamic DNS if you choose that route.
- Configure Security: Always use strong, unique passwords, and consider implementing SSH key-based authentication for enhanced security.
- Test Your Connection: Verify that you can reliably access your Raspberry Pi from a remote location.
By following the steps outlined in a comprehensive guide, you can set up a secure and functional remote IoT system that meets your needs and budget. Remember, in order to get a better understanding of the topics, it's beneficial to explore frequently asked questions regarding securing remote IoT devices using Raspberry Pi.
Embrace the Future of IoT
Remote IoT behind router Raspberry Pi free is more than just a buzzword—it’s a powerful tool that can transform the way you interact with technology. By leveraging free and secure remote access solutions, you unlock unparalleled control and insight into your Raspberry Pi-powered IoT projects. From monitoring system health to controlling devices on the fly, the possibilities are endless.
This guide has walked you through the fundamental aspects of achieving free remote IoT access with your Raspberry Pi, emphasizing the importance of security and highlighting various methods to overcome common network challenges. Whether you're a hobbyist or a professional, embracing remote IoT will undoubtedly enhance your projects, making them more efficient, resilient, and accessible.

Detail Author:
- Name : Trystan Williamson
- Username : goodwin.lilly
- Email : gideon.mclaughlin@hotmail.com
- Birthdate : 1972-09-05
- Address : 8121 Von Ramp Apt. 983 North Hailie, PA 93305
- Phone : 503.776.5252
- Company : Rippin PLC
- Job : Head Nurse
- Bio : Exercitationem error voluptatibus aliquam unde dicta. Dignissimos repudiandae officia asperiores consequatur laudantium. Voluptas est et minima mollitia. Minima in aut earum voluptate.
Socials
tiktok:
- url : https://tiktok.com/@kkertzmann
- username : kkertzmann
- bio : Repellat nobis maiores aut.
- followers : 6013
- following : 2347
instagram:
- url : https://instagram.com/kertzmannk
- username : kertzmannk
- bio : Nostrum deleniti est iusto quaerat ut vitae. Magnam voluptas odio sit laudantium consequatur qui.
- followers : 1072
- following : 2800
twitter:
- url : https://twitter.com/kaleb.kertzmann
- username : kaleb.kertzmann
- bio : Blanditiis quisquam sit assumenda ea ut. Harum qui similique repudiandae ut similique. Debitis error labore voluptas numquam impedit sit esse dolorum.
- followers : 6687
- following : 2895
linkedin:
- url : https://linkedin.com/in/kaleb_id
- username : kaleb_id
- bio : Debitis quidem sint vero ab velit et.
- followers : 4290
- following : 1987
facebook:
- url : https://facebook.com/kertzmann2006
- username : kertzmann2006
- bio : Dicta et nobis fugiat voluptatem quas omnis qui voluptas.
- followers : 6666
- following : 510
